A Sweet Story Behind This Recipe
Growing up, my mom always had a stash of homemade granola bars in the kitchen. Whether it was for an after-school snack or a quick bite before heading out for weekend adventures, these bars were a staple. Now, as someone who prioritizes healthy and nutritious eating, I wanted to recreate that childhood favorite but with a wholesome twist. That’s how these Peanut Butter & Date Granola Bars came to life! They are naturally sweetened, packed with protein, and perfect for a grab-and-go snack.
If you love peanut butter and crave a chewy, energy-boosting snack, you’re in for a treat. Let’s dive into the step-by-step process of making these delicious granola bars!
Why You’ll Love These Granola Bars
- Naturally Sweetened – These bars use dates instead of refined sugar, giving them a natural caramel-like sweetness.
- Packed with Protein – Peanut butter and oats provide an excellent source of protein to keep you full longer.
- Easy to Make – With just a few simple ingredients, you can prepare these in under 30 minutes.
- Great for Meal Prep – Make a batch, store them in the fridge, and enjoy a healthy snack all week!
Ingredients You’ll Need
To make these Peanut Butter & Date Granola Bars, gather the following ingredients:
Main Ingredients
- Medjool dates – 200g (pitted)
- Rolled oats – 150g
- Peanut butter – 120g
- Honey or maple syrup – 60g
- Chopped nuts (almonds, walnuts, or pecans) – 50g
- Chia seeds – 10g
- Vanilla extract – 1 teaspoon
- Cinnamon (optional) – ½ teaspoon
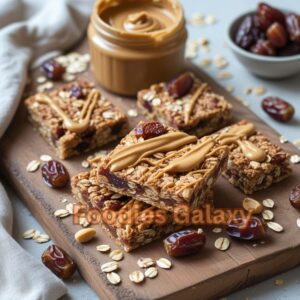
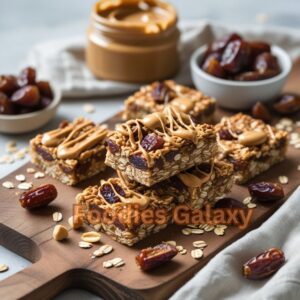
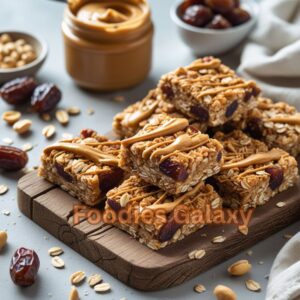
- Dark chocolate chips (optional) – 50g
Step-by-Step Guide to Making Peanut Butter & Date Granola Bars
Step 1: Prep the Dates
Start by soaking the pitted Medjool dates in warm water for 10 minutes. This softens them, making them easier to blend. Once softened, drain the water and place the dates in a food processor. Blend until they form a sticky paste.
Step 2: Mix the Dry Ingredients
In a large mixing bowl, combine the rolled oats, chopped nuts, and chia seeds. If you like a hint of spice, add cinnamon for extra warmth and flavor.
Step 3: Melt Peanut Butter & Sweetener
In a small saucepan over low heat, mix the peanut butter and honey (or maple syrup). Stir continuously until it becomes smooth and well combined. Remove from heat and add vanilla extract.
Step 4: Combine Everything
Pour the melted peanut butter mixture over the dry ingredients. Then, add the date paste and mix everything thoroughly using a spatula or clean hands. The mixture should be sticky enough to hold together. If it’s too dry, add a teaspoon of warm water.
Step 5: Press into a Pan
Line an 8×8-inch baking dish with parchment paper. Transfer the mixture into the dish and press it down firmly with the back of a spoon or your hands. If you’re using chocolate chips, sprinkle them on top and press them gently into the mixture.
Step 6: Chill & Set
Place the pan in the refrigerator for at least 1 hour to allow the bars to firm up. If you’re in a hurry, freeze them for 20–30 minutes.
Step 7: Slice & Enjoy
Once set, remove from the fridge and lift the parchment paper out of the pan. Slice into 10–12 bars and enjoy!
Nutrition Information (Per Bar)
| Nutrient | Amount |
|---|---|
| Calories | 180 kcal |
| Protein | 6g |
| Carbohydrates | 22g |
| Fiber | 4g |
| Fat | 8g |
| Sugar | 9g |
These bars are a balanced combination of healthy fats, fiber, and protein, making them a great snack choice!
Storage Tips
To keep these bars fresh, store them properly:
- Refrigerator – Store in an airtight container for up to 7 days.
- Freezer – Freeze for up to 3 months. Wrap individual bars in parchment paper for easy grab-and-go snacking.
Creative Ways to Customize Your Granola Bars
Want to mix things up? Here are a few variations to try:
- Nut-Free Option – Swap peanut butter for sunflower seed butter and replace nuts with shredded coconut.
- Extra Crunch – Add crushed rice cereal for a crispy texture.
- Chocolate Lovers’ Dream – Drizzle melted dark chocolate over the bars before chilling.
Frequently Asked Questions
1. Can I use quick oats instead of rolled oats?
Yes, but the texture will be softer. Rolled oats provide a better chewiness.
2. What if my mixture is too dry?
Add a little warm water or extra peanut butter to help bind the ingredients.
3. Can I use almond butter instead of peanut butter?
Absolutely! Almond butter gives a slightly different flavor but works just as well.
4. Are these bars gluten-free?
Yes, as long as you use certified gluten-free oats, these bars are 100% gluten-free.
5. Can I make them without a food processor?
Yes! If you don’t have a food processor, mash the soaked dates with a fork until they form a paste.
Final Thoughts
Peanut Butter & Date Granola Bars are a simple, nutritious, and delicious snack that anyone can make at home. They’re perfect for meal prep, breakfast on the go, or a mid-day energy boost. Plus, they’re made with wholesome ingredients that you can feel good about eating.
Now that you have this easy step-by-step recipe, it’s time to head to the kitchen and try it yourself! If you love this recipe, let me know in the comments, and don’t forget to share it with your friends.
Thank You for Reading!
I truly appreciate you taking the time to read this blog post. Your support and enthusiasm for homemade, healthy recipes mean the world to me! I hope this recipe brings joy to your kitchen and fuels your day with goodness. If you try it, let me know how it turns out—I’d love to hear from you! Stay inspired, stay healthy, and happy cooking! 😊🍽️